By Gregory Han

After years of apartment living in Los Angeles, my wife and I moved into a small home tucked inside a tree sheltered canyon in the neighborhood of Mt. Washington, CA. It’s a small 1930’s multi-level home with an unusual floor plan, the sort of home with quirks that elicit responses like “whoa!” and “that’s weird, but cool”. We’re still figuring out the interior, but inspired by Jaime and her backyard project, we’ve turned our attention outward to all of the possibilities presented by our own slice of North East LA.
The furthest side of our backyard offered an elevated spot and a blank canvas for an assortment of ideas.
Our backyard abuts against a steep hillside, shaded by a canopy of native black walnut and mature citrus trees, a section where the hill with the greenery make our yard feel secluded from the world. The previous tenants left a flattened dirt landing overlooking the property, a patch large enough to spark the imagination about smaller projects like a raised bed garden or even a modest deck.
But over and over I kept returning to the idea of materializing my appreciation for small space structures. Fed by a steady diet of books like Foster Huntington’s The Cinder Cone and the lasciviously titled, Cabin Porn – I began plotting, planning, and Pinteresting ideas with aspirations of taking advantage of Southern California’s year around indoor/outdoor climate.

The Handy Home Products Majestic shed – with overhead storage galore and a work surface designed into the back wall the perfect height to use as a standing desk – would be the foundation for our backyard project.
With the assortment of home improvement projects we were already working on since moving in, I was already dropping into our local Home Depot pretty regularly. Between picking up painting supplies, tools, and accessories, I’d always check out the selection of affordable prefab tool sheds sold at our local location. I was impressed with the idea of one day converting one of their more popular prefab wooden tool sheds – specifically the Handy Home Majestic Wood Storage Shed – into a space finished with flooring for relaxing or using as a remote office. The potential was there. It was ultimately a timely price drop that helped nudge me toward taking on the project.

The foundation going up, right on “shed-ule”.
With a help of a good friend and a few days of dedicated shovel work, I got the area leveled and prepared for the shed foundation. I opted to hire the help of a Home Depot contractor to put up the shed, noting I didn’t have all the required tools or material to put everything together within the constraints of my budget; the hired expertise made the project go much faster.

In about 9 hours the shed was fully constructed, complete with shingled roof, transom windows, and 48 sq. ft. of overhead storage. An impressive feat noting the over 1,100lbs of material required to put together the pre-cut pieces. I highly recommend the option for help through Home Depot if you’re either without the tools, live in a difficult to access area, or simply prefer someone skilled to build the structure for you.

The prefabricated shed nearly halfway completed. Each piece is pre-cut for easier assembly.
Once the shed was completed I was able to take the project from there…then realized I didn’t really know what the heck I was doing beyond the ideation phase. I was acquainted with most basic of power tools, but I knew I needed help as a property virgin. I enlisted the help of my friend, Mina, a designer comfortable and skilled with wood working tools; she helped guide me through every step of using our various rental saws, instilling the important mantra, “measure twice, cut once”.

Unexpected rainfall and uninvited critters required covering up the openings overnight as we opened up the shed side wall.
The most challenging task was opening up the length side facing toward the back of our home, all in the hopes of expanding the view and bringing in more light. Because even a small shed benefits from as much light invited inside. A combination of a circular saw and reciprocating saw worked beautifully to remove the length of one side (with the help of a few strategic whacks of a rubber mallet). Under Mina’s watchful eye I got pretty good wielding that circular saw, if I don’t mind saying so myself, using a built-in laser guide upward and along the shed’s length. Eventually we ended up opening the walls even further, installing a double header for reinforcement.
The opening would allow easier work and ventilation within, especially helpful when it came to painting the interior using a paint sprayer (I used the Graco TrueCoat Airless Paint Sprayer, a model that caught my eye because it doesn’t require thinning out paint or primer; the variable speed capabilities would also come in handy).
I learned quickly OSB (oriented strand board) can drink up paint if applied too heavily, but the paint sprayer was up to the task of spraying even coats with just a turn of a dial. Thanks to timely warm weather, I had the interior painted only in a few hours, even when factoring in for drying time between coats (I used a Behr Premium Plus Ultra paint and primer in one). Once applied the pure white paint both protected the unfinished walls and transformed the interior into something that felt/looked more like a room instead of a tool shed.

Why had I never invested in a paint sprayer until now? Partnered with an all-in-one primer and paint mix, covering the interior went by quickly.
Next was putting in a roll of TrafficMASTER underlayment in preparation for installing flooring. This was probably the easiest part of the whole project: unroll, measure, cut, attach, finished!
I had picked out a dark hued HDF click and lock hardwood flooring to install over the underlayment; the process was simple enough for Mina and I to figure out even as first time flooring installers. We cut pieces to size then locked planks into place with a satisfying “click” like a gigantic jigsaw puzzle. A few hours later, the amorphous dream became a tangible reality once the last piece clicked into place and we could look out from the shed down into the backyard.

“Measure twice, cut once!”
The funny thing about any home improvement project is plans will undoubtedly change. And indeed I’ve since revised my initial goals. When I began the project the intent was to install sliding barn doors; now I’m in the process of building and integrating an upward opening plexiglass pane window (awaiting shipment of custom cut lightweight plexiglass). This will bring in more light even while closed and offer a superior seal to the elements; when opened it will operate as an awning. Landscaping is on hold in expectation of El Niño downpours, but I’ve situated a few drought-tolerant plants around the shed.

Building a small attached deck outward from the hillside from the longitudinal shed’s opening could provide a spot for chairs and plants while also elevating the shed higher for drainage; a living wall of succulents are planned to soften the sides aesthetically alongside a paint job matching our home. Lastly, when budget allows there are wistful ideas of installing a small array of solar panels to bring some interior lighting without extending electrical from the main house. So many ideas, so little time!
Nevertheless, even at this stage I think I’ve got the start of a really great place to hangout and enjoy throughout the year. The addition of plants in and around the shed helps blend in the building and a few choice decorative pieces gives the interior a welcoming ambiance. My wife, who began suspicious of the shed initially, now approves (thankfully!); she finds sitting inside its walls calming and peaceful. When completely empty, it feels like the perfect exercise studio for one.

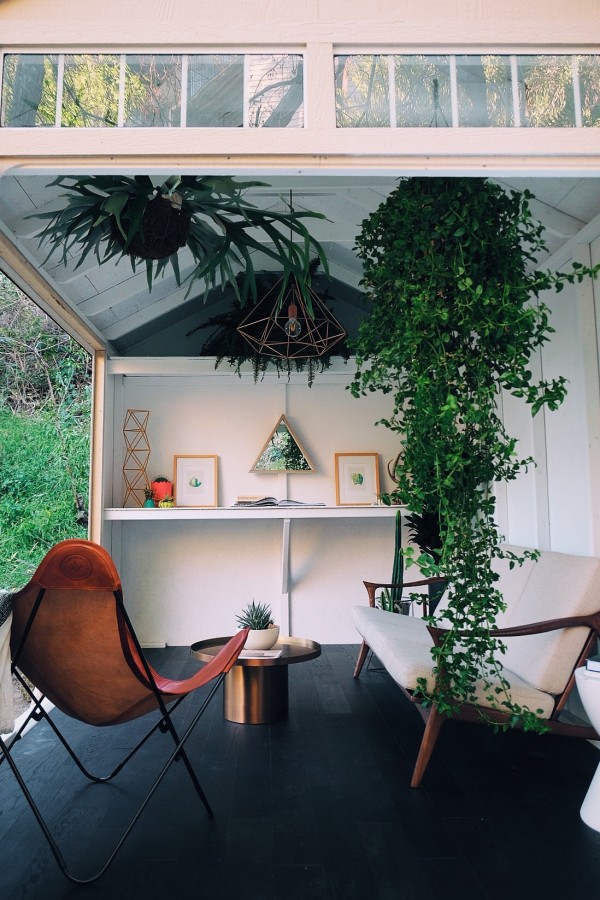
Palermo Chair by The Citizenry

Pedestal and planter by Eric Trine; Modernica Case Study Ceramic Cylinder.

The shed’s 8 foot length table offers the perfect height to use as a standing desk.

MFEO Troika reclaimed wood mirror; Aventurine Mix prints by Hamish Robertson.

Himmeli Light Diamond Cage Pendant by Panselinos

The dark wood flooring looks especially dramatic as the sun begins sinking below our hillside horizon, changing from a warmer oak hue to the deep “coffee” the style is named after.
Friends have mentioned the converted tool shed now reminds them of a Japanese teahouse, a poolside cabana, or a treehouse. That such a small simple space could evoke all these images is a testament to the power of a little paint, some handsome flooring, and a little sweat. At the end of it all I’ve graduated from a beginner…well…to a beginner with a little more experience. But I am now much more confident about reconfiguring a structure and making it my own. With future plans to forge ahead investing more weekends to customize the structure beyond its utilitarian roots into a relaxing escape in our very own backyard, I’m very pleased that a daydream is quickly becoming a reality…
*Special thanks to Mina Cheong and Dan Kitchens for their help.
This post was made possible by Home Depot.
Source:: http://feedproxy.google.com/~r/design-milk/~3/z-s9nhPZ2lc/